Our Leaking Shower Repair Procedure

We cover all these areas and more to 100% waterproof your leaking shower or bath area.

Why are our leaking shower repair methods so effective?

In its simplest terms, we have designed a combination of specialised tools, products and procedures that allow our company to 100% waterproof the area without the need to remove tiles.

This obviously saves a lot of time, money and inconvenience in that each leaking shower can be sealed in 3-4 hours and is usable the next day.

The Shower Repair Centre Diamond Seal Procedure

Our leaking shower repair procedure in short

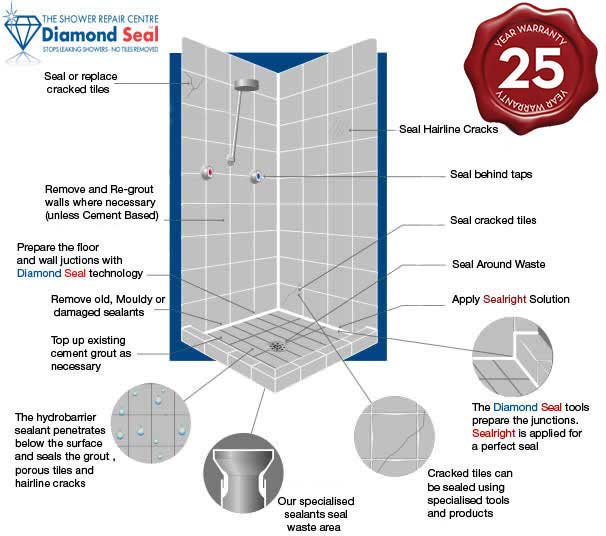
OUR TRAINED TECHNICIANS WILL……

  1. Check areas of the leaking shower or bath for signs of water penetration
  2. Visually assess the internal areas of the leaking shower or bath for damage or deterioration.
  3. Remove any mouldy or deteriorated sealants such as silicon.
  4. Strip the existing grout out of the walls where necessary. (We do not strip sand and cement based grout, or remove grout where it may cause damage to the tiles).
    Cement based grout is usually of a sandy texture and is very difficult to remove without the risk of scratching / breaking your existing tiles.
  5. Strip out any damaged grout from the floor area as needed. (Floor is normally sand and cement based) If the floor grout is still in good condition we will prep it and coat in an absorbent hydro barrier sealant which soaks in to seal the grout. This is not visible on completion.
  6. Strip out grout from around the drain (waste) section as needed.
  7. Prepare floor and wall junctions with DiamoSmart® diamond preparation technology.
  8. Remove all waste material & vacuum excess dust from prepared areas.
  9. Re-grout/top-up wall grout where necessary, replace damaged grout on floor only if needed. (Grout has waterproof additive so there is no need to Hydro Seal replaced grout).
  10. Silicon the internal areas of the shower screen. (To ensure water can’t track under the screen – Complimentary Service).
  11. Apply SealRight™ sealant to Wall and Floor junctions and drain (waste), area if needed.
  12. Seal the leaking shower or bath area using our hydro barrier sealant on floor and walls if the grout is not replaced. This sealant is applied on the wall and floor areas as needed, forming a waterproof barrier beneath the surface of the grout. This soaks in and waterproofs anything that is porous, such as grout lines and hairline cracks.
  13. Remove all tools and inspect to ensure workspace is left clean and tidy.

Please Note: The reason we systematically seal all areas within your leaking shower or bath,
is to eliminate both present and future causes of leakage. Thus honouring our

25 year product written guarantee.

NB: Whilst our trained technicians will endeavour to detect any leaks they are not licensed leak detectors or plumbers.

After service procedure

Please leave the shower/area 12 to 24 hours to dry as advised by our technician, then use as normal. You may also notice that there is a fine white powder left on your tiles. This is simply the residue left from the re-grouting of the walls or floor that can be wiped with a damp cloth, prior to using the shower.